Naked Objects
By Richard Pawson and Robert Matthews
Writing tests
Acceptance tests
Whereas unit tests are principally concerned with whether a method has been written correctly, user acceptance tests are concerned with whether the functionality can be combined to deliver a result of value to a user. We adopt the approach of basing acceptance tests on a series of 'stories', which are enacted through the mock views. As well as checking that the required functionality is actually available, the acceptance test automatically generates documentation that explains how the story would play out through the real user interface. This is done through the self-commenting methods that are provided by the views. Since the acceptance tests should be based on user-specified requirements, this auto-generated documentation can serve as a significant proportion of the user training manual.
The structure of an acceptance test
Before looking at how a story is coded, we will look at how a test is set up and initiated. The following code is taken from the acceptance test code for the ECS application:
import org.nakedobjects.testing.AcceptanceTest;
import org.nakedobjects.testing.View;

public class ECSStories extends AcceptanceTest {

    public ECSStories(String name) {
        super(name);
    }

    public static void main(java.lang.String[] args) {
        ECSStories st = new ECSStories("ESC User Stories");
        st.start();
    }

    public void setUp() {
        registerClass(Booking.class);
        registerClass(City.class);
        registerClass(Customer.class);
        registerClass(Location.class);
        registerClass(CreditCard.class);
        registerClass(Telephone.class);

        adminCreateCities();
    }

    public void runStories() {
        story1BasicBooking();
        story2Reuse();
        story3ReturnBooking();
        story4CopyBooking();
        story5LocLoc();
    }
}
Acceptance tests are written by extending the
org.nakedobjects.testing.AcceptanceTest class. This class
has a constructor that takes a name for the suite of tests. Your derived
class therefore needs to implement a constructor that calls this
particular superconstructor. To start the test, call the
start method in the superclass.
The start method controls the tests and creation
of the documentation. After setting up the framework it calls the
setUp method where you should register the same set of
classes that will be made available to the user in a live application.
After this method has completed, the
org.nakedobjects.testing.Documentor class is initialized
with the name of the test suite that was passed to the superconstructor.
This creates the HTML documentation file, which is given a file name
based on the test suite name (for the above example the file will be
ESC_User_Stories.html). Any code executed from this point
on will automatically be documented. If there are any objects that need
to be set up ready to be used during the tests, but which do not need to
be described in the documentation, then this should be done as part
of the setUp method after any required classes have been
registered. (The call to adminCreateCities in the code
above is an example.) Once the documentor is running, the
runStories method is invoked and each of the test
methods is called in turn, generating documentation as they execute. If
any story fails at any point then the exception is passed back to the
user and the test will stop, because in our approach to acceptance testing the stories
are deemed to depend upon each other. This is in contrast to what happens
in Junit where the tests run independently.
The structure of a story
There is a common pattern to most stories that reflects both the way the framework is used and how the documentation is generated. To help the development team to keep track of what they are testing, and to help the user break down each task, the stories can be split into logical steps, which can include a description of the subtask.
A story should start with a call to the story
method, to mark this story as separate from the previous one and to give it
a title. Each stage of the story is then started by a call to the
step method, which can take a text string describing
what is being done next. Then come the expected user actions, such as
creating an instance, dragging and dropping objects, selecting menu
options and editing fields. After the user actions it is common to
check the state of the objects to ascertain that everything is
progressing as expected - i.e. that requirements are being met. It is also
possible to confirm that certain actions are not allowed at a certain
point.
Both the actions and the checks are carried out by invoking specific methods on the views. When they run, these methods all add descriptions to the documentation, detailing the steps, explaing how to manipulate the objects, showing how their states change, and making notes of what can't be done. This process, therefore, not only checks the logic of the business object but also directs the user toward what can and can't be done with them. The following code shows the beginning of the second ECS story and demonstrates this common pattern:
public void story2Reuse() {
    story("A booking where the previous used locations are used");

    step("Retrieve the customer object.");
    View customer = getClassView("Customers").findInstance("Pawson");

    step("Create a booking for this customer.");
    View booking = customer.rightClick("New Booking");
    booking.checkField("Customer", customer);

    step("Retrieve the customer's home and office as the...");
    booking.drop("Pick Up",
        customer.drag("Locations", "234 E 42nd Street, New York"));
    booking.drop("Drop Off",
        customer.drag("Locations", "JFK Airport, BA Terminal"));
    booking.checkField("City", "New York");

    step("Use the customer's mobile phone as the contact...");
    :
    :

}
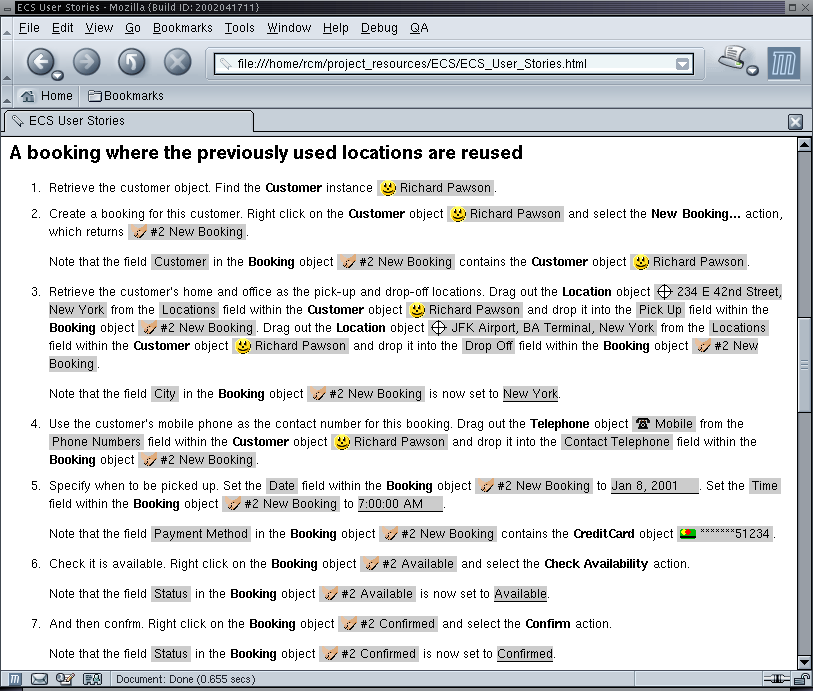
When the test is run and completes without any exceptions, then it will have also been documented in HTML. The following shows the output from this facility, using cascading style sheets with the HTML page to render it so the objects, field and menus can be distinguished:
The following methods from the AcceptanceTest
class structure the documentation:
-
public void story(String title)creates a new story and adds a title for it to the document. In the current version this is added using the <H2> (heading level 2) tag. -
public void subtitle(String subtitle)adds a subtitle to the document using the <H3> (heading level 3) tag. -
public void step(String description)adds another step to the instructions. This is added as an <LI> (list item) tag. If thedescriptiontext does not end with a full stop, then one will be added to prevent the description running into the generated text. On the first call to this method, after a call tostoryorsubtitle, an opening <OL> (ordered list) tag is added; the closing tag is added when the nextstoryorsubtitleis invoked. -
public void step()adds another step but without a description. This works in the same way as the previous method. -
public void append(String text)adds any other text to the current step. This is added without any tags so the text is simply concatenated to the instructions as they stand at that point.
As the test runs the above methods provide the document with its
structure, and the simulated interactions, by generating their own
comments, describe the actions to be taken. For example the statement
customer.rightClick("New Booking") produces the text
"Right click on the Customer object 'Richard Pawson' and select the
'New Booking...' action, which returns '#2 New Booking'." (The
previous screenshot shows the formatted output including the
icons).
The mock object views also allow the state of an object to be
checked. For example the statement booking.checkField("Customer",
customer) would add "Note that the field Customer in the Booking
object '#2 New Booking' contains the Customer object 'Richard Pawson'" to
the document. These checking methods are provided in addition to the
assert... methods that can still be used even though
this is not a unit test, nor is it based on the TestCase
class. If any of these checks fail, then an
IllegalActionError is thrown and the test will stop. As
each one passes it adds an explanation to the documentation. The purpose
is to explain to the user what effect the previous step would have had on
the object and therefore the state it will now be in.
Unlike these check... methods, the
assert... methods do not produce any documentation.
The following check methods are to be found in the
org.nakedobjects.testing.View class:
-
public void checkTitle(String expected)checks that the view's title (as generated by the object'stitlemethod) is equal to the value specified inexpected, adding a note to the documentation to show what the title should now be. -
public void checkField(String fieldName, String
				expectedTitle)
checks that the named field within the view has a title that matches the value specified inexpectedTitle. It adds a note to the documentation showing what text should be displayed in that field, either as a value or as an object's title. -
public void checkField(String fieldName, AbstractView
				expected)
checks that the named field, within the view, references the same object that the view specified inexpectedreferences. It adds a note to the documentation showing what text should be displayed in that field, either as a value or as an object's title. -
public void checkCantRightClick(String
				option)
checks that the named option cannot be selected. It adds a note to the documentation explaining that this option is not available. Theappendmethod inAcceptanceTestcan be used to give a reason. -
public void checkCantDrop(DragView dropObject)checks that the specified object (contained by the view) cannot be dropped onto the current view. It adds a note to the documentation explaining that this drop is not possible. Theappendmethod inAcceptanceTestcan be used to give a reason.
Copyright (c) 2002 nakedobjects.org You may print this document for your own personal use, or you may copy it in electronic form for access within your organisation, provided this notice is preserved.